- The Pumpkin Wizard - All Access Members Only
Main menu:
How to make your own patterns, using Corel Paint Shop Pro (Photo X2)
With Corel's Paint Shop Pro products, you can easily create your own patterns from a variety of different picture sources. This demonstration was made using PSP X2, but I have used Paint Shop Pro from version 7, and the process has not changed for the most part in any release I have used.
The first step, of course, is picking out a picture to make your pattern. For many subjects, the internet is a great source for image files. When you searching for images, try to use the search engine’s advance features to look for large pictures. For instance, Google Image Search has a button on the left side of the screen to select size. Always start with large, and if you don’t find what you’re looking for there, then try medium.
If you’re using a family photo, make sure it is as large as possible to start with. If scanning a printed photo, make sure you set your scanner to at least 300 DPI.
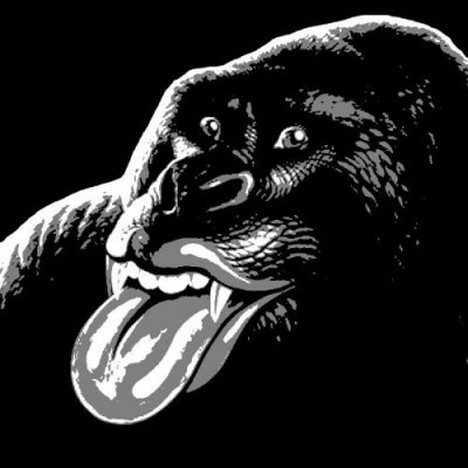
It happened that I ran across a picture of the new Rolling Stones album cover for their "Grrr" album. I rather liked the gorilla with the Stones lips & tongue and thought that might make a good pattern. So I downloaded the .jpg file to a working directory in my computer.

Once you have a source image, the first thing you will want to do is crop out only the most important parts of the picture. You do this by using the rectangle selection tool to select the area you want, then go under the Image tab and select "Crop to Selection". This picture didn’t need cropped, which is also fine.
The next this to do is make the picture into a standard, usable size. I like to adjust the smaller size, be that width or length, to 800 pixels. This works out best later when we are using some of the other features of the program. (To save space in this tutorial, they have only been sized to 400 pixels wide. They were worked at 800 pixels).
Once you have your picture cropped and resized, it’s time to get started on the process that makes this picture into a pattern. The first step in this process is to go under the Image tab again, and select Grayscale. This puts your picture into a black & white image as seen below.

Once your pattern is in grayscale, you have to decide if there are any areas that need to be outlined, filled with black so there is not a huge cut-out area, or other similar issues. In this case, I outlined the top of the gorilla’s fur with black, and then filled in all of the areas above that outline.

Next, on most pictures, the brightness and contrast have to be adjusted to get all of the details to come out in the pattern. To see which way you need to adjust it, you will need to take one step ahead and posterize the image. This is under Effects/Artistic Effects/Posterize . Select 3 levels and you may also want to click the "Preview on Image" button so you can see how it will look on the entire picture. If you’re lucky, sometimes the brightness and contrast are just right and you can move on from there. If not though, you will want to hit the Undo button to get it back to grayscale.

Select the "Adjust/Brightness & Contrast/Brightness & Contrast" dropdown and begin adjusting those two parameters to make the details stand out more from the background. Don’t do too much, or you will end up with just 2 colors when you posterize. The usual way this is done is to adjust the brightness & contrast, then posterize to check out the results, then go back to adjusting, and do the posterize again. Repeat that process until your posterized picture looks like it has the most deail possible without washing out in white.
After you have posterized your image, the next few steps are to get rid of small and insignificant bits of color that are no use to the overall picture. First in this process is to use the dropdown "Adjust/Add or Remove Noise/Despeckle". This removes the finest little specs in the pattern and begins to clean it up. Next up in the cleanup process is to use the paintbrush tool to manually remove any extraneous specs and small areas that are unimportant to the overall pattern, and that would just add to the complexity of the carve. A general rule is when you’re working on a pattern that is either 800 pixels high or wide, that a 5 pixel brush size is the very smallest bit you would want to keep in the pattern, and that is mostly around very detailed areas such as eyes. In most other areas, a brush size of 7 or 8 is more appropriate. Make sure your brush settings are set to round shape, size 5-8, hardness 100, step 1, density 100, rotation 0, and opacity 100.
Also, take this time to look for any "floaters" in the white sections. These are pieces of pumpkin that would be floating in midair because all of the pumpkin around it has been cut away. If these floaters are unimportant, just fill them in with white. If they are important, they try to attach them to the nearest gray or black section with a gray line. This will give the floater an attachment point, but since that area is peeled, it won’t be quite as noticeable as if it was left totally uncarved. You should pay special attention to the eye areas, as they often have floaters due to the whites of the eyes surrounding the iris. Also, blond hair has a tendency to have floaters in the middle where the hair is slightly darker than the blond around it.

When all of your speckling and small unimportant areas cleaned up, and all your floaters resolved, the image you see is what your pumpkin will look like when carved, only in yellow and orange. You can always save a copy of the image now, and change the gray to orange and white to yellow using the color replacement tool on the left toolbar on the copy, and save it as a "mock-up" as we call them.

Back to your main, 3 color, black gray and white pattern, the last step to making it a carvable pattern is to make the image negative, under the "Image/Negative Image" tab. The reason you use a negative image to carve is that in most cases it saves ink when printing the patterns, and it also follows the carving directions on the site.

And there you have it. You’ve made your own pattern!
Happy Carving!